
In order to send and receive E-mail through your website hosted with FastWebEngine, you can configure Outlook as your E-mail client. However, in an effort to reduce the amount of SPAM delivered on the Internet, some Internet Service Providers (ISP) block standard outgoing E-mail ports - specifically Port 25.
If you find that your ISP will not allow you to connect to your hosting account E-mail server using Port 25 (default setting in most E-mail clients) - you can change this to bypass your ISP's restrictions.
*Most ISPs will allow this change, however, some can be more restrictive than others, at which point you will have to contact your ISP to learn how to use their Outgoing Mail Server for sending email.
This step-by-step tutorial will demonstrate how to setup Outlook to use Port 587 with Authentication so that you will be sending and receiving E-mail quickly and conveniently. Start by configuring Outlook to check E-mail services hosted by FastWebEngine - Let's begin:
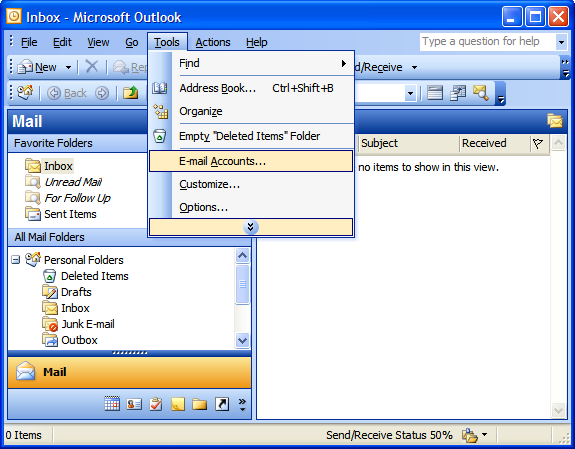
Step 1:
(1) Open Outlook and select the Tools button and navigate to the E-mail Accounts selection. This will open up a new dialog box.
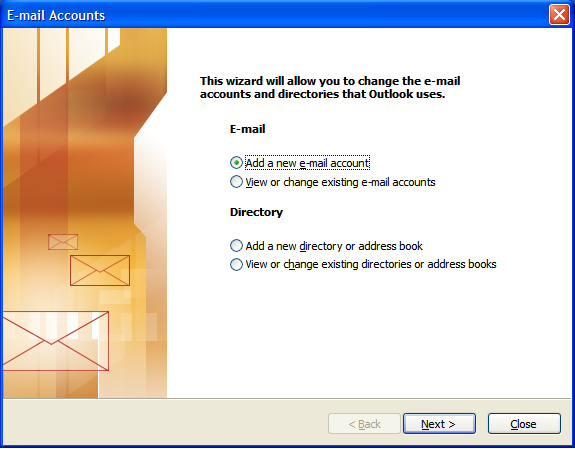
Step 2:
Select the Add a new e-mail account option in the E-mail Accounts dialog.
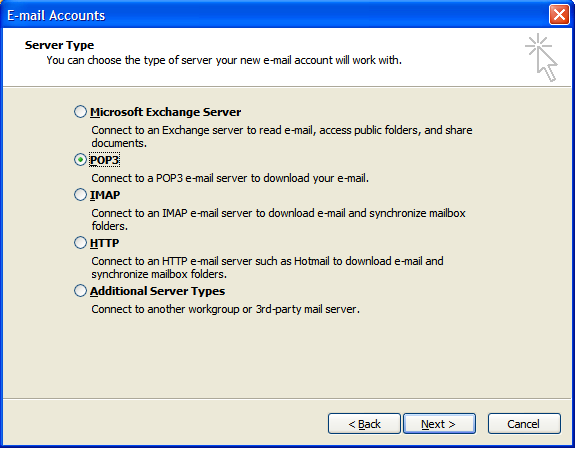
Step 3:
On the Server Type window, select the POP3 option.
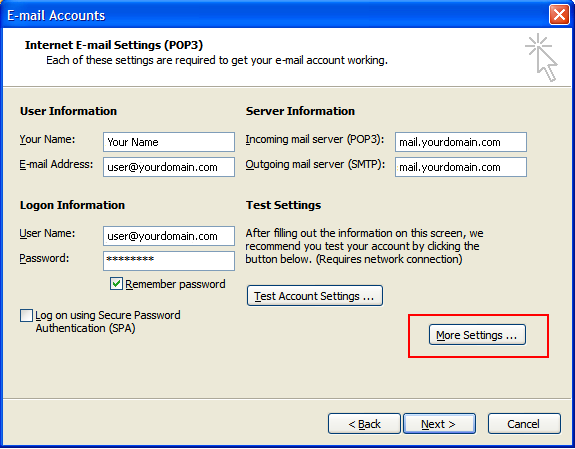
Step 4:
The Internet E-mail Settings (POP3) dialog window will be where most information will be filled in the text boxes provided.
- Under User Information section enter your First Name and Last Name (e.g. John Doe).
- Enter your E-mail address in the E-mail Address text box (e.g. yourusername@yourdomain.com)
- Under the Logon Information section enter your full E-mail address as your User Name.
- Enter your password in the Password text box
- Under the Server Information section enter the following addresses:
- Incoming mail server (POP3): mail.yourdomain.com
- Outgoing mail server (SMTP): mail.yourdomain.com
- After you have entered the above information, Press the More Settings... button to enter the new port settings for this account and move on to step 5 below.
Step 5:
- When the new More Settings... dialog window opens select the Outgoing Server Tab.
- Under the Outgoing Server section make sure the My outgoing server (SMTP) requires authentication box is checked and the Use same settings as my incoming mail server radio button is selected.
- Next click on the Advanced tab to enter the required port settings and move on to step 6 below.

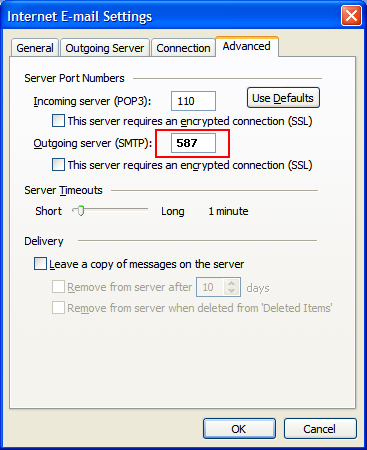
Step 6:
- Under the Advanced tab section change the default port number (25) for the Outgoing server (SMTP) setting to Port 587.
- Click on the Ok button to save your changes and return to the E-mail Accounts dialog window and move on to step 7 below.
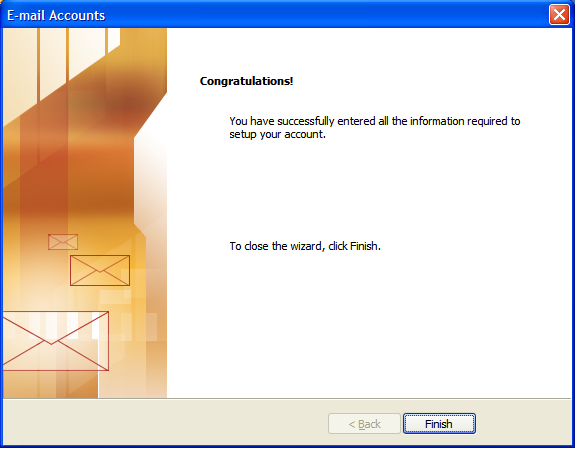
Step 7:
- After returning to the E-mail Accounts dialog window, press the Test Account Settings... button. The Test Account Settings dialog will open and Outlook will test the settings you have configured.
- If everything was entered correctly, you should see green check marks and the status message Completed.
- Click the Close button on the Test Account Settings dialog if it does not close automatically.
- Click the Next button at the bottom right corner of the E-mail Accounts dialog window.
- Click the Finish button at the bottom right corner of the E-mail Accounts dialog window.
- Congratulations, your new account is configured properly.
Potential Issues:
While most ISPs will allow you to configure Outlook to use Port 587 for sending email, some may restrict this port setting. If you follow this tutorial and are still unable to send E-mail, you may have to use your Internet Service Provider's Outgoing E-mail Server ("SMTP" or Outgoing Server Setting in "Step 4" above). Please contact your Internet Service Provider to learn about their recommended outgoing configuration settings in order to send E-mail.
