Step 1: Generate A CSR
To begin the process login to the control panel and click on the SSL Certificates link under the Advanced Features heading. This will take you to the SSL certificates page where you can configure the Certificate Signing Request or CSR.

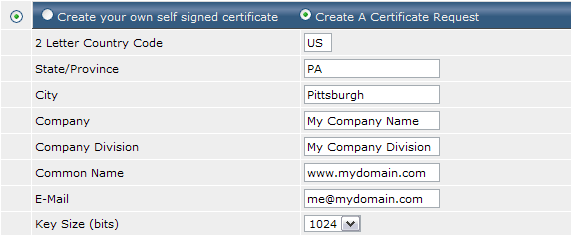
- Click the radio button next to the Create A Certificate Request option.
- Enter the required information for your SSL certificate in the form fields below. The Common Name field refers to the address/domain name of your website that will be included with the SSL certificate. Your website will be secure only at this address. In the above example, many SSL providers will secure both https://www.mydomain.com as well as https://mydomain.com (notice the "www." before the domain name). For this reason we suggest including the "www" before your domain name. However, you should verify that your SSL certificate issuer will accommodate both www and non-www variations of your domain name.
When you have finished filling out all of the fields, click the Save button at the bottom of the screen. You will then see a the CSR that has been generated:

Copy this string of characters (including the BEGIN/END CERTIFICATE REQUEST lines) into a plain text editor such as Windows Notepad and save the file to your hard drive. You will need this CSR when you purchase the SSL certificate.
Step 2: Purchase An SSL Certificate
When purchasing a certificate, you will be asked to enter contact details, company information, and your domain name. Additionally you will need the following:
- The CSR that you have generated
- The software that generated the CSR (*may not be required)
- Your common name (e.g. the address/domain of your website)
The CSR
Simply paste the CSR given to you by the control panel, including the BEGIN/END CERTIFICATE REQUEST lines. There will be a text box in the order form to paste to. Please ensure the CSR is saved and pasted as plain text.
Software that Generated the CSR (*if asked for)
Choose Apache-ModSSL, or "Other" if you don't see Apache-ModSSL in the list. Do not worry about making a mistake, as this information is collected for statistics purposes only.
Your Common Name
The "Common Name" refers to the address/domain of your website that will go on the SSL certificate (see Step 1 above). Enter this address without the "http://" unless otherwise specified by the certificate seller.
Step 3: Install the SSL Certificate
Access the SSL menu by clicking on the "Advanced Tools" link from the main control panel menu, then click the "Install SSL Certificates" icon.

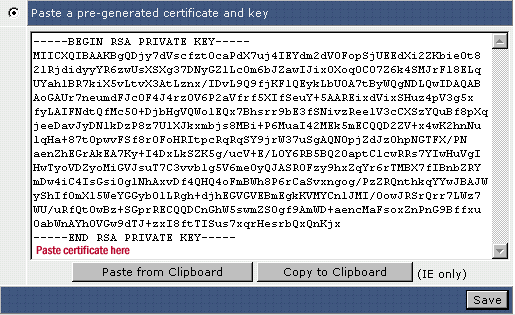
- Click the radio button next to the Paste a pre-generated certificate and key option.
- The field should automatically display the RSA Private Key for your domain (DO NOT to delete the Key). Copy and paste the SSL certificate that you purchased immediately below the RSA Key and click Save. At this point your new SSL Certificate is installed and will be ready to use. You may have to refresh your web browsers' cache to have it recognize the new certificate.
*If required: Depending on the type of SSL Certificate you have purchased, you may also need to follow the next step and enter a CA Root Certificate if provided by your SSL vendor.
Step 4: Install the CA Root Certificate (*Only if required)
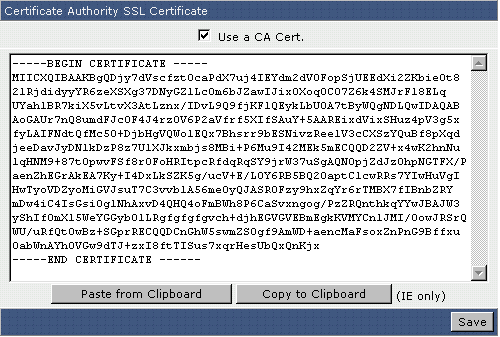
Return to the main SSL menu. At the very bottom is a link Click Here to paste a CA Root Certificate. After clicking on the link you can copy and paste the CA Root Certificate you were provided in the textbox. Check the option to Use a CA Cert, then click the Save button.

*Important: Remember To Check the "Use a CA Cert." Box
The installation of a CA Root Certificate is not always required and will depend on your SSL certificate provider.
Uploading Files to your Secure Site
In the past files needed to be uploaded to your "/domains/yourdomain.com/private_html" directory in order to be served over an HTTPS connection. However, it is now common to configure a symbolic link that directs requests for the private_html directory to the public_html directory. This allows users to maintain all website content in one location and elimates the need for duplicating files. You may upload your files using the control panel's built-in file manager or through an FTP client of your choice.
If you have configured your domain in this fashion, simply upload your files to the corresponding "/domains/yourdomain.com/public_html" directory.
Please Note: In order to disable the "private_html" directory for the domain you are hosting, refer to the following article:
How do I disable the private_html directory in order to only use the public_html directory?

