
To configure the default Android email client for IMAP email services please follow the required steps below. This step-by-step tutorial will demonstrate how to make the necessary changes so that you will be sending and receiving email on your mobile phone. Depending on the brand and model of your Android phone, some of the screens may appear different. However, the overall process for adding a new email account will be the same.
Step 1: Getting Started
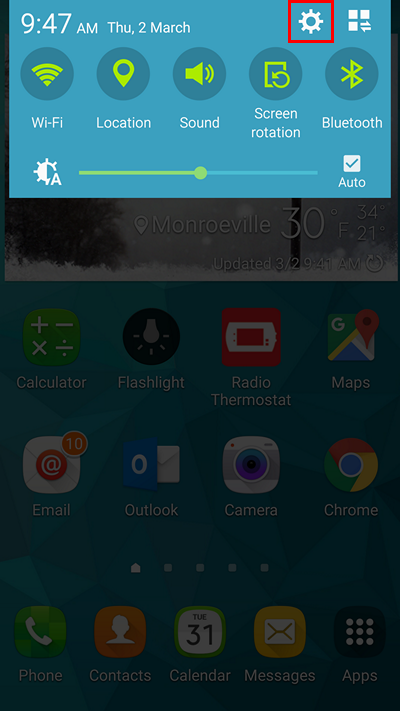
First navigate to the Android Settings window. On some phones you can do this by swiping down from the top of the screen and pressing on the gear icon.
Step 2: Android Settings
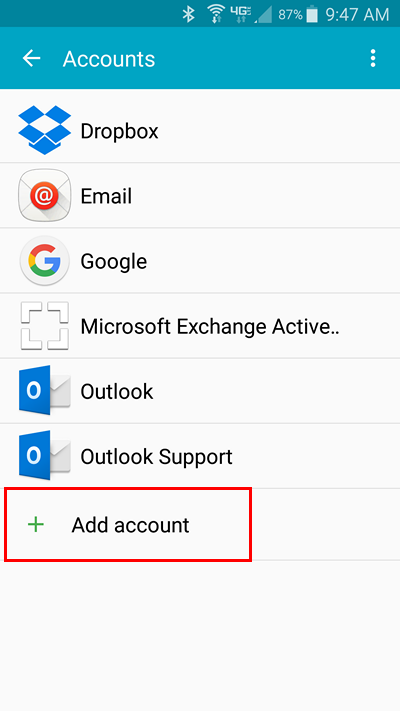
Wthin the Android Settings window scroll down and select Accounts. Some phones may list this under a different heading.

Step 3: Add Account
On the Accounts screen select Add account.
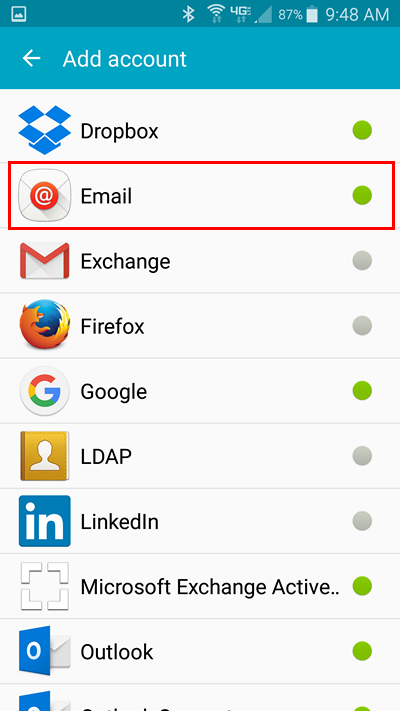
Step 4: Account Type
On the Add Account screen select Email for the account type. Some phones list this as Other.
Step 5: Account Sign-In Details
On the next screen you will enter your Sign-in Details.
- Enter your Full Email Address
- Enter your Email Account Password
- Press the Manual Setup button.

Step 6: Email Account Type
On the next screen you will choose the account type. Select IMAP.

Step 7: Incoming Server Settings
On the next screen you will enter the Incoming Server Settings. Here you will enter the following information:
- User Name: Enter your FULL Email Address
- Password: Enter your Email Account Password
- IMAP Server: Enter your Incoming Mail Server in the format mail.mydomain.xyz
*Remember to change "mydomain" to the domain that you are configuring and the extension "xyz" to your domain extension (.com, .net, .org etc.) - Security Type: Set this to None if you are not using an SSL certificate
(*for SSL/TLS Security read more below) - Port: Enter 143
- Press Next
*PLEASE NOTE: If you have purchased an SSL certificate or are using a FREE Let's Encrypt certificate generated in the control panel (recommended) set the Security Type to either (1) SSL (accept all certificates) and the Port to 993, or (2) TLS (accept all certificates) and the Port to 143.

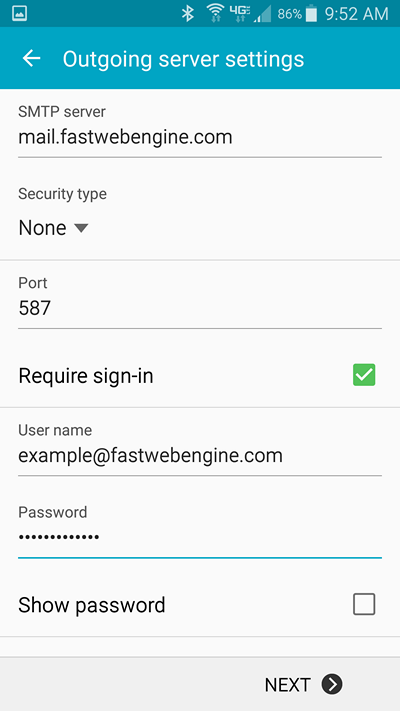
Step 8: Outgoing Server Settings
On the next screen you will enter the Outgoing Server Settings. Here you will enter the following information:
- SMTP Server: Enter your Outgoing Mail Server in the format mail.mydomain.xyz
*Remember to change "mydomain" to the domain that you are configuring and the extension "xyz" to your domain extension (.com, .net, .org etc.) - Security Type: Set this to None if you are not using an SSL certificate
(*for SSL/TLS Security read more below) - Port: Enter 587
- Require Sign-In: Check this option
- User Name: Enter your FULL Email Address
- Password: Enter your Email Account Password
- Press Next
*PLEASE NOTE: If you have purchased an SSL Certificate or are using a FREE Let's Encrypt certificate generated in the control panel (recommended) set the Security Type to either (1) SSL (accept all certificates) and the Port to 465, or (2) TLS (accept all certificates) and the Port to 587.
Step 9: Account Options
The Android email client provides several account options that can be tailored to your specific needs. Once you have set your preferred options, click Next.

Step 10: Final Settings
The final option is to configure an account name that you will see in your list of accounts, as well as your name that will be displayed on outgoing messages. After entering your preferences press Next.

Step 11: Setup Complete
After pressing Next from the previous step you will be returned to the Accounts screeen. Your IMAP email account is now configured and you should be able to send and receive email using your account hosted with FastWebEngine. You can close out of the Accounts screen and open the Android email client.

